Clusters
A cluster is a set of one or more Compute Server nodes where optimization jobs can be performed. Each node has a job limit that indicates the maximum number of jobs that can be executed on that node simultaneously. The limit should reflect the capabilities of the machine (cores, memory, etc.) and typical job characteristics.
Compute Server nodes support a number of advanced capabilities such as job queueing and load-balancing. And if a node fails, new jobs are dispatched to other available nodes.
The Cluster Nodes Page
The Cluster Nodes page in the Cluster Manager looks like this:

This page displays the nodes that have been registered with the Cluster Manager. Nodes can be sorted by various attributes by clicking on the corresponding column headers. Up and down arrow icons allow you to select the sorting direction.
Nodes displayed in the table can be filtered using the Search box.
The number of rows of the table.
When the table has been filtered, two numbers are displayed to the right of the page title showing respectively the number of nodes matching the current filtering and the total number of nodes. If no nodes have been filtered, only the total number of nodes is displayed.
When you select a node from the table (highlighted in blue), the tabs below the table allow you to obtain additional information about that node. Choosing a tab brings up the corresponding information.
The JOB LIMIT button allows the user to change the job limit for that node.
The STOP button allows the user to stop that node.
Job Limit
The job limit for a node determines how many jobs can be executed simultaneously on that node. This limit can be changed using the JOB LIMIT button (5). This button opens a dialog that allows you to specify a new limit:
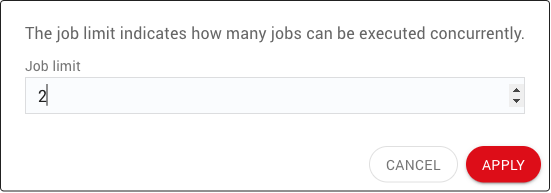
If you submit a job to a cluster where all nodes having reached their limits, the job is added to the job queue.
Note
Only users with SYSADMIN or ADMIN roles can change the job limit.
Stop / Restart
The Cluster Nodes page allows the user to stop or restart a node of the cluster. Stopping the node is done through the STOP button, which is available if the node is alive. When clicked, the button opens a dialog that requests confirmation:
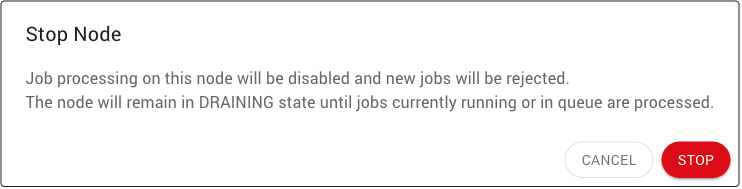
After the node is stopped, the STOP button for the node is replaced by a START button, which allows the user to start the node again.
Note
Only users with SYSADMIN or ADMIN roles can stop or restart a node.
Licenses
Note
Access to the Licenses page is restricted to SYSADMIN and ADMIN users.
The Licenses page provides details on the licenses being used for each node of the cluster.
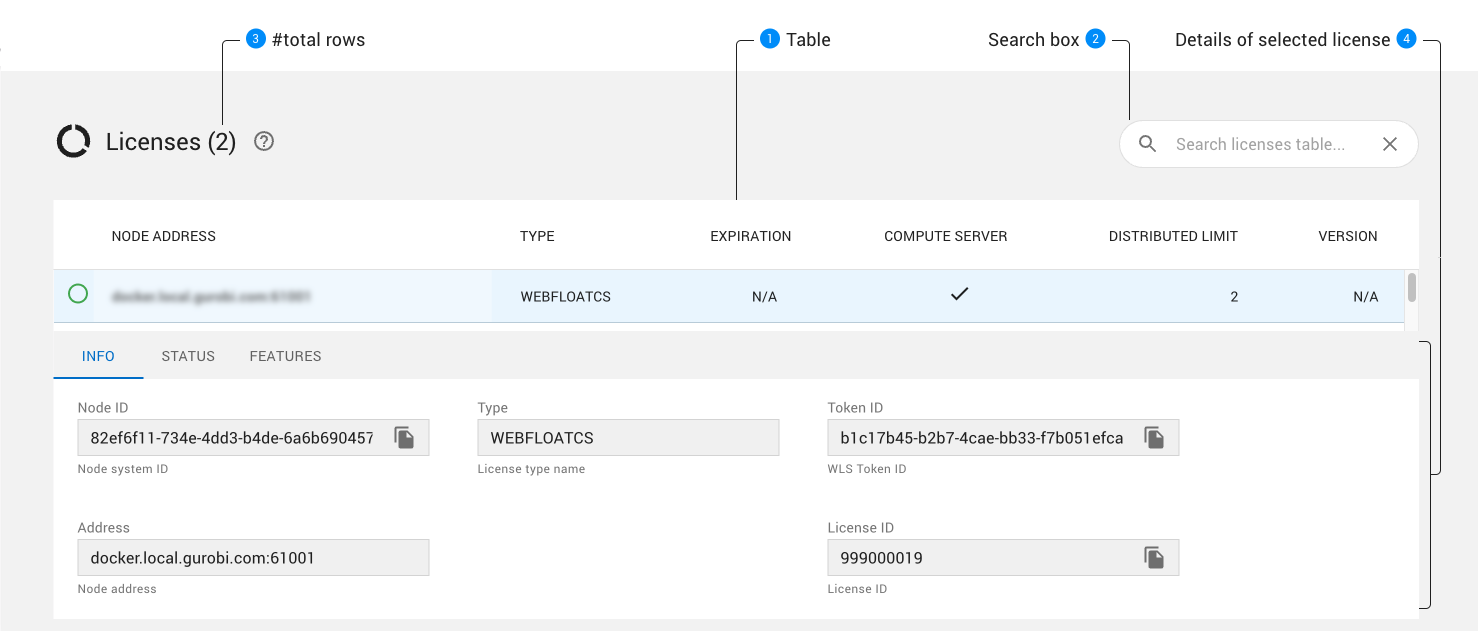
The license table provides license information for each node.
The
NODE ADDRESScolumn allows you to identify the node that each line refers to.Nodes displayed in the table can be filtered with the Search box.
The number of rows of the table.
When the table has been filtered, two numbers are displayed to the right of the page title showing respectively the number of nodes matching the current filtering and the total number of nodes. If no nodes have been filtered, only the total number of nodes wil be displayed.
The tabs below the table provide more details about the selected license. Choosing a tab brings up the corresponding information.